

The primary bathroom is the room most Northern Virginia homeowners start each day in, and it is often the one that has aged the least gracefully. In many houses built from the 1980s through the 2000s it still has the original oversized garden tub, a small fiberglass or tiled shower, a builder-grade double vanity and lighting that was never quite enough. A primary bathroom remodel is the chance to fix how the room works, not just how it looks: a bigger shower you can walk straight into, a vanity with real storage for two people, a private toilet, warm floors and light that flatters instead of glares.
This guide is written for homeowners in Fairfax and Loudoun counties who are planning that project. It covers the layouts that work in typical NoVA primary baths, how a curbless (zero-entry) shower is actually built, the freestanding tub versus no-tub question, double vanity and toilet clearances from the building code and the National Kitchen & Bath Association (NKBA), tile and heated floors, ventilation and lighting rules, typical budget tiers, county permits, and what living through the remodel is like. Code figures come from the 2021 Virginia Residential Code as published on UpCodes, and permit rules link to the county pages that publish them. Costs are typical published ranges from named sources, not quotes for your house.
Primary Bathroom Remodeling at a Glance
- Scope decides everything. Keeping fixtures where they are (a refresh) costs far less than moving the shower, toilet or vanity (a reconfiguration), and borrowing space from a closet or bedroom (an expansion) is a different project again.
- The garden tub is the usual target. Many NoVA primary baths give a large corner of the room to a tub that rarely gets used. Replacing it with a larger walk-in or curbless shower, or a smaller freestanding tub, is the most common layout change.
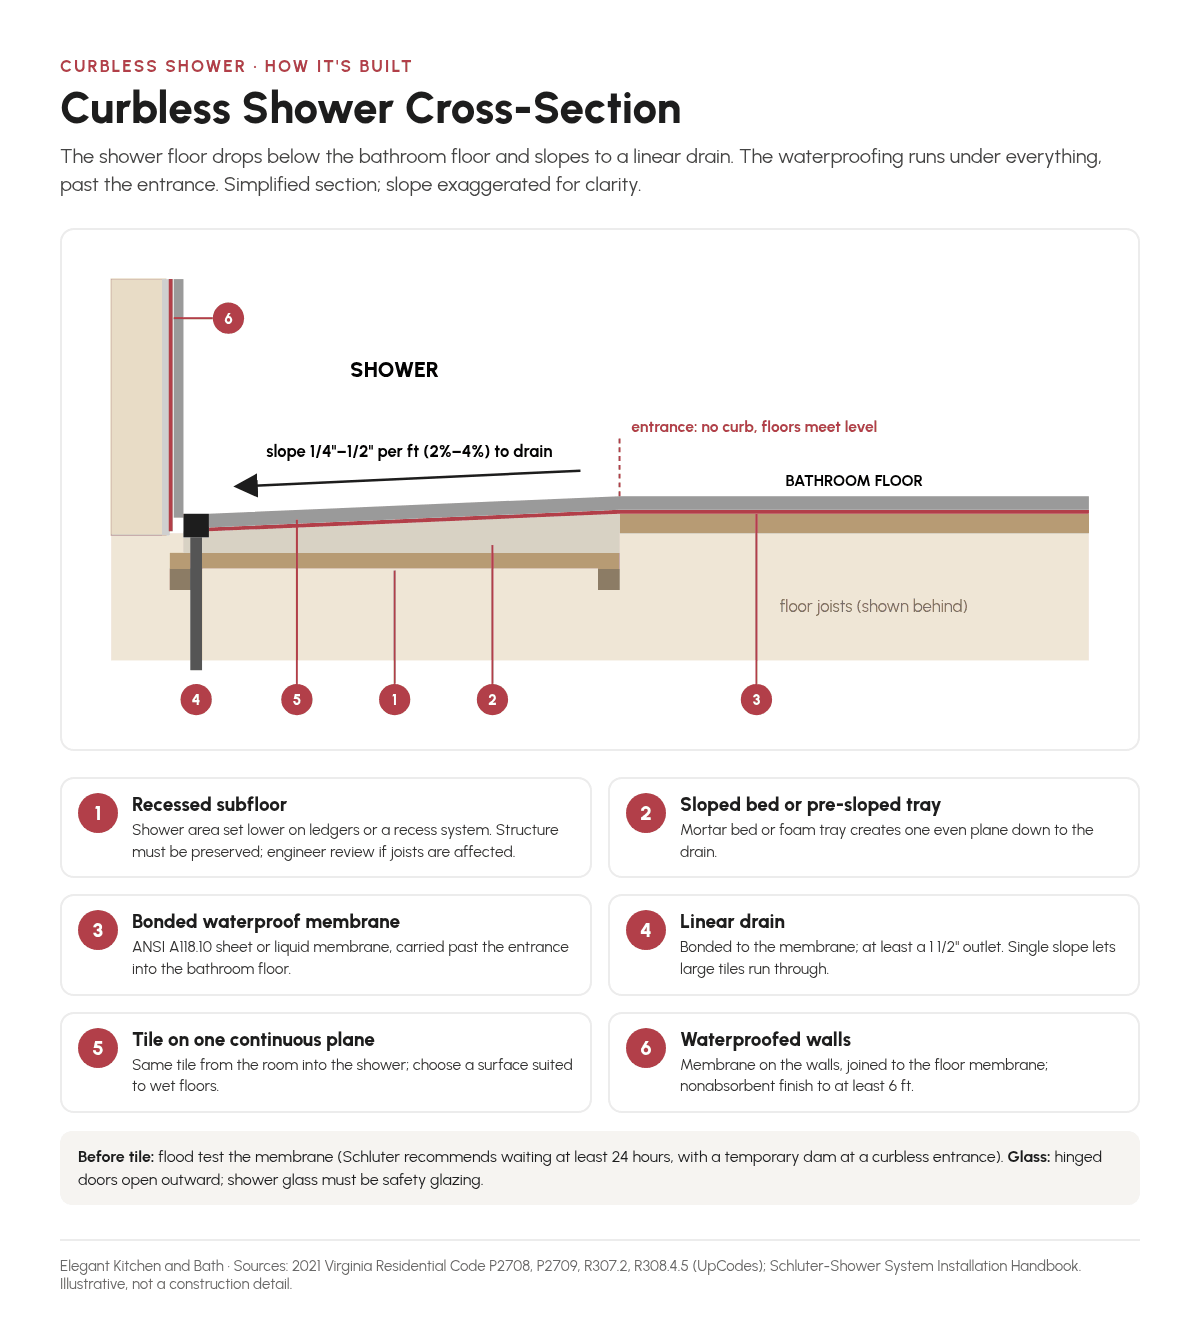
- Curbless showers are a floor project. A zero-entry shower needs the floor to slope to the drain (between 1/4 and 1/2 inch per foot under the code), waterproofing beyond the shower itself, and usually a recessed subfloor so the bathroom floor stays level.
- Clearances are not optional. The code sets minimums for toilets, sinks and showers. NKBA recommends more generous spacing, for example 36 inches between double sink centerlines.
- Permits apply. Fairfax County lists bathroom remodels and relocated plumbing or electrical fixtures as permitted work. Loudoun County requires a building permit for residential alterations, with separate trade permits.
What Makes a Primary Bathroom Remodel Different
A hall bath or a powder room is usually a compact, single-user room with a tub-shower combination, one sink and little room to move anything. A primary bathroom, sometimes still called the master bathroom, is a different kind of project for four reasons.
It serves two people on the same schedule
In most homes, two adults use the primary bath at the same times of day. That makes the layout questions sharper: two sinks or one long one, a separate toilet room, a shower large enough that two people are not waiting on each other, and storage that does not force one person’s things onto the other’s counter. A good primary bath plan reduces friction at 6:30 a.m. before it adds any luxury.
It has more room, and more choices
Primary baths are larger than secondary baths, so there are real layout alternatives: keep the tub or drop it, enlarge the shower or move it, close off the toilet or leave it open, add a linen tower or a makeup station. The extra square footage is an opportunity, but it also means more tile, more glass, more lighting and more plumbing to coordinate. According to the 2025 U.S. Houzz Bathroom Trends Study, a survey of registered Houzz users who were remodeling a bathroom, the median spend on major remodels of bathrooms of 100 square feet or more was $25,000 nationally in 2024, with the top 10% at $70,000 or more. Northern Virginia prices run higher than national figures, which we cover in the budget section.
It is tied to the bedroom suite
Because the bathroom sits next to the primary bedroom and its closets, the walls around it are often negotiable. Some of the best primary bath remodels borrow a few feet from an oversized closet or a bedroom corner. That is also where the structure, the ductwork and the plumbing stacks start to matter, so it should be planned rather than improvised.
It is where long-term planning pays off
Most homeowners remodel a primary bath once and live with it for many years. Decisions that cost little during construction, such as blocking in the walls for future grab bars, a curbless shower entry or a wider door, are expensive to add later. We cover this in the section on designing for today and later.
If you are still deciding between a targeted shower update and a full remodel, our comparison of tub-to-shower conversion vs. full bathroom remodel walks through when each makes sense. For the broader service overview, see our bathroom remodeling services.
Typical Northern Virginia Primary Baths and What Homeowners Change
Northern Virginia’s housing stock shapes what a primary bath remodel looks like. Census Bureau data for 2024 (American Community Survey, via Census Reporter) shows that roughly 42% of Fairfax County’s housing units were built before 1980 and about half were built between 1960 and 1989. In Loudoun County, about 78% of units were built in 1990 or later, and about half between 2000 and 2019. Those numbers describe the whole housing stock, not bathrooms, but they explain the two patterns we see most often. Every house is different, so treat these as general patterns rather than rules.
Older Fairfax County homes (1960s to 1980s)
Many colonials, split-levels and ramblers from this era were built with modest primary baths, sometimes little more than a hall bath attached to the bedroom. A single vanity, a tub-shower combination or a narrow stall shower, and a toilet squeezed between them are common. The typical goals are to gain space, replace the tub-shower with a proper walk-in shower, add a second sink if the room allows, and bring ventilation and electrical up to current code. In homes built before 1978, any disturbance of painted surfaces must also follow the EPA lead-safe Renovation, Repair and Painting rules.
1990s and 2000s homes in Loudoun and western Fairfax
Many houses in Ashburn, Brambleton, South Riding, Centreville, Chantilly and similar communities were built with the classic builder-grade primary suite: a large drop-in or corner garden tub set in a tiled or cultured-marble deck under a window, a separate shower that is often only about three feet by three feet or slightly larger, a double vanity with a cultured-marble top, a separate toilet room, and a large mirror lit by a single bar light. The room is often generous in size but poorly divided. The tub takes the best corner and gets used a few times a year, while the shower that gets used every day is the smallest fixture in the room.
What usually changes
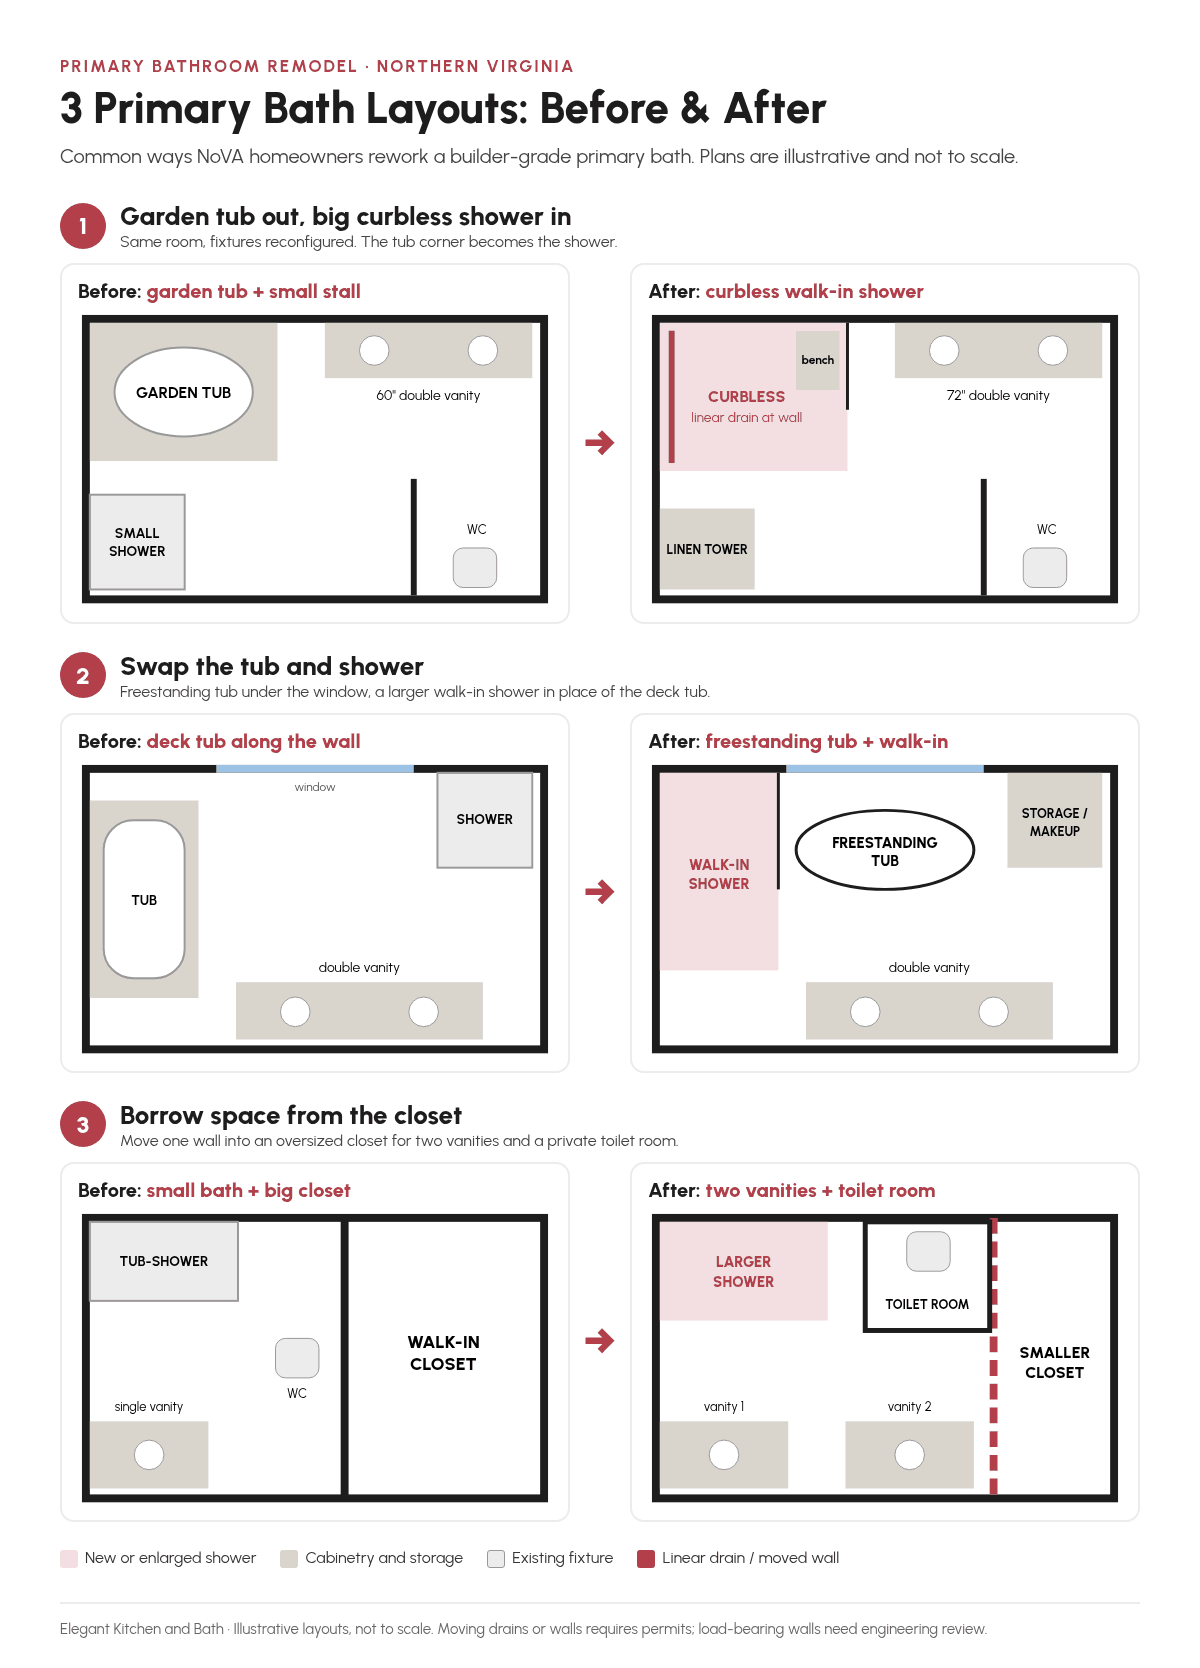
- The garden tub goes, or gets smaller. Removing the tub deck frees the space for a larger shower, a freestanding tub, or both.
- The shower gets bigger and easier to enter. A low-curb or curbless walk-in shower with frameless glass, a bench and a niche replaces the small stall.
- The vanity gets more storage. Drawer banks, a tower, or a longer top replace a basic two-door base.
- Lighting and ventilation are rebuilt. Layered lighting and a properly ducted, quiet exhaust fan replace the original bar light and builder fan.
- Floors get warmer. Electric radiant heat under new tile is a common addition once the floor is open anyway.
National survey data points the same way. In the Houzz 2025 study, 26% of renovating homeowners removed the tub altogether and 34% upgraded it, while 9% kept their existing tub and 25% had no tub to begin with. Among homeowners who removed a tub, 82% used the space to enlarge the shower. Overall, 39% of renovating homeowners increased the size of their shower.
Layout Options: Keep, Reconfigure, or Expand
Every primary bath plan starts with one decision: how much of the room’s plumbing and walls will move. That choice drives the budget, the permits and the timeline more than any finish selection. There are three broad paths.
1. Keep the layout (refresh in place)
The tub, shower, toilet and sinks stay where they are. You replace the surfaces, the vanity, the fixtures, the lighting and the glass. This is the least disruptive option and it can still change the room completely, especially with a new tiled shower, a better vanity and good lighting. It works best when the existing layout is already sound and the problems are mostly cosmetic or age-related. Keep in mind that a new shower pan, new tile and new valves still involve plumbing and waterproofing work, so even an in-place remodel is rarely just a finish swap.
2. Reconfigure within the existing footprint
The walls of the room stay put, but fixtures move. The most common version removes the garden tub and turns that area into a larger walk-in or curbless shower, sometimes with a freestanding tub in the old shower’s spot. Other versions move the toilet into its own room, swap the vanity and shower walls, or turn two small sinks into one long vanity. Moving a drain is the main cost driver here, because it means opening the floor, re-routing waste lines with the correct slope and venting, and working around joists. In Fairfax County, relocated plumbing fixtures are permitted work.
3. Expand into an adjacent closet or bedroom
When the room is simply too small, the answer is often next door. Borrowing two or three feet from a walk-in closet, a hallway linen closet or a corner of the bedroom can make room for a real double vanity or a separate shower and tub. This is the most involved option. Walls may be load-bearing, ducts and wiring run through them, and closet space has to be replaced somewhere else. It also triggers more design and permit work, because new walls and structural changes have to be shown on the drawings. If a wall is load-bearing, the same principles apply as in our guide to removing walls for an open-concept kitchen: an engineer confirms the load path before demolition is scheduled.
| Scope tier | What is typically included | When it fits | Relative cost class |
|---|---|---|---|
| Refresh in place | New tile, vanity and top, fixtures, toilet, lighting, mirrors, glass and paint. Shower rebuilt in the same spot. Plumbing stays where it is. | The layout already works and the room just looks and performs its age. | $ to $$ (lowest of the three) |
| Reconfigure in the footprint | Everything in a refresh, plus moving fixtures: tub removed or relocated, shower enlarged or made curbless, toilet moved into its own room, new drain and supply runs, new circuits. | The room is big enough, but space is badly divided, usually around a garden tub. | $$ to $$$ |
| Expand or spa-level | Everything above, plus borrowed space from a closet or bedroom, new walls, possible structural work, and premium items such as steam, heated floors throughout, custom millwork or large-format slabs. | The room is too small for two users, or the goal is a full suite transformation. | $$$ to $$$$ (highest) |
How to choose between them
Start with how the room fails today, not with a picture of a finished bathroom. Write down the daily frustrations: no counter space, a shower you cannot turn around in, a toilet in the line of sight from the bedroom, nowhere to put towels. Then check which tier fixes each one. If most of the list is solved by a better vanity, better light and a new shower in the same place, a refresh is the efficient answer. If the list keeps coming back to the tub taking up space, you are in reconfiguration territory. If the problem is that two people simply cannot fit, look at expansion.
Two practical checks help early on. First, find out what is below the bathroom. A finished ceiling below means drain moves will involve drywall repair downstairs, and a slab foundation means concrete cutting. Second, find the plumbing stack, the vertical drain and vent pipe that the toilet ties into. Toilets that move far from the stack need new drain and vent routes, which may not be practical on every floor plan. A short site visit answers both questions, and you can see how we approach that first visit on our process page.
Curbless and Walk-In Showers: Design, Drains, Slope and Waterproofing
The shower is the center of most primary bath remodels, and the curbless shower is the version homeowners ask about most. It is also the one that is easiest to get wrong, because what makes it work is hidden under the tile. This section explains what a curbless shower is, how it is built, and how to tell whether your bathroom is a good candidate.
What a curbless (zero-entry) shower is
A curbless shower, also called a curb-free, zero-entry, zero-threshold or barrier-free shower, has no raised curb at the entrance. The bathroom floor continues into the shower at the same level, and the shower floor then slopes gently down to a drain. A conventional walk-in shower keeps a curb, typically a few inches high, that you step over and that holds water in. A low-curb shower is the middle ground, with a shorter curb that is easier to step over.
Homeowners choose curbless designs for three reasons. They look cleaner and make the room feel larger, because one continuous floor runs wall to wall, often with large-format tile. They are easier to use, with nothing to trip on and nothing to step over when you are tired, injured or carrying a child. And they are the shower that still works if someone later uses a walker or wheelchair. Curbless is still the less common choice: in the Houzz 2025 study, among homeowners upgrading a shower, 44% chose a low-curb model, 42% an alcove model and 20% a curbless model. In a primary bath where you plan to stay, it deserves a serious look.
Point drain or linear drain?
Every shower floor slopes to a drain. The drain type decides how the floor is shaped.
- Center (point) drain. A square or round drain near the middle of the shower. The floor slopes down from all four sides, which creates the familiar shallow funnel. It works well in square showers and costs the least, but the slopes run in four directions, so large tiles usually have to be cut into a pattern that follows the folds of the floor, or smaller tiles are used.
- Linear (trench) drain. A long, narrow channel set against the back wall, a side wall or across the entrance. The floor slopes in one direction only, like a gentle ramp. That single plane lets you run large-format tile through the shower without cuts at the slope changes, and it is the reason linear drains are so common in modern curbless shower ideas. Wall-side placement keeps the drain out of the way. Entrance placement catches water at the threshold, but manufacturer instructions add conditions. Schluter’s shower system installation handbook, for example, recommends that a linear drain placed at the entrance span the full width of the opening to limit overflow, and notes that secondary drainage may be required in the drying area.
The drain still has to meet plumbing rules. The Virginia Residential Code requires a shower drain outlet of at least 1 1/2 inches (section P2708.2), and the drain body must be compatible with the waterproofing system you use, because the membrane or liner has to seal to it.
Floor slope: how much is enough
The code sets both a minimum and a maximum. Under section P2709.1 of the 2021 Virginia Residential Code, the finished shower floor must slope uniformly toward the drain at not less than 1/4 inch per foot (2%) and not more than 1/2 inch per foot (4%). In a curbless shower, the low point of the floor has to drop enough below the bathroom floor to carry water to the drain. For a shower that is five feet deep with the drain at the back, 1/4 inch per foot means the floor at the drain sits about 1 1/4 inches below the entrance, plus whatever the drain and its tile need. That small number is the whole design problem: the shower floor must be lower than the bathroom floor, and the floor structure underneath has to make room for it.
The same section explains why a curbed shower is simpler. Where a shower has a curb, the code requires the curb to be at least 2 inches deep, measured from the top of the curb to the top of the drain, and no more than 9 inches. The curb does the work of holding water in. Without it, slope and drain placement have to do that job alone.
Waterproofing: membranes, liners and the wet zone
Tile and grout are not waterproof. Every tiled shower depends on a waterproof layer underneath. Section P2709.2 of the Virginia Residential Code lists the materials that can line an on-site built shower floor, including sheet lead, sheet copper, approved plastic liners, hot mopping, and sheet-applied, load-bearing bonded waterproof membranes that meet the ANSI A118.10 standard. Liquid, trowel-applied membranes that meet ANSI A118.10 are also allowed. The code also requires the lining to extend at least 2 inches beyond the rough jambs and at least 2 inches above finished thresholds.
That last rule is where curbless showers need extra thought. With a curb, the liner simply runs up and over it. With no curb, there is no raised threshold to turn the waterproofing up. In practice, curbless showers are built with bonded membrane systems that carry the waterproofing out past the shower entrance into the bathroom floor, often across the whole room in larger primary baths. Schluter’s handbook puts it plainly for curbless applications: waterproofing must be installed in all areas subject to water exposure. How your county inspector applies the threshold rule to a specific curbless detail is worth confirming at plan review rather than at the inspection.
Walls matter too. Section R307.2 requires shower walls to have a nonabsorbent surface to at least 6 feet above the floor, and most tiled showers carry the waterproofing to the ceiling or at least above the shower head. Niches and benches are the usual weak points, so they should be part of the same membrane system rather than a separate add-on.
Recessing the subfloor
Because the shower floor has to sit below the bathroom floor, a true curbless shower on a wood-framed floor usually means lowering the subfloor in the shower area. There are a few ways to do it:
- Drop the subfloor between the joists. The existing subfloor is cut out and a new panel is set lower, on ledgers fastened to the sides of the joists. Schluter’s handbook shows this recessed assembly for joists spaced no more than 19.2 inches on center.
- Use a recess system that hangs from the top of the joists. Some manufacturers sell brackets or framed systems that lower the shower area without cutting the joists.
- Raise the rest of the bathroom floor. Instead of lowering the shower, a thin pre-sloped tray goes on the existing subfloor and the rest of the room is built up with an extra layer of plywood and an uncoupling or heating membrane. This avoids touching the joists but raises the floor, so the transition at the bathroom door has to be checked.
- Cut the slab. On a concrete slab, as in some townhouses and basement baths, the concrete is cut out and re-poured lower around the drain.
Whatever the method, structure comes first. Schluter’s handbook states that recessing the floor of a bathroom must preserve the structural integrity of the construction and may require a qualified design professional, such as an architect or engineer. Joists must never be notched or cut deeper without that review. This is one reason curbless showers cost more than curbed ones and why the subfloor scope should be written into any estimate. Angi puts a traditional curbed walk-in shower at about $2,500 to $5,000 and says going curbless adds another $500 to $700 or more, depending on tile, shower size and the extra waterproofing needed. Those are national figures for the shower itself, not quotes. They do not cover recessing joists, an engineer’s review or carrying waterproofing across a larger floor, which is where a primary bath curbless project usually adds cost.
Glass, splash and doorless designs
Without a curb, water control comes from slope, drain placement and the glass. Common approaches include a fixed glass panel that covers the spray zone and leaves a walk-in opening, a full enclosure with a door, or a doorless walk-in with the shower head aimed away from the opening. Curbless doorless showers need a deeper shower, because water travels farther when nothing stops it. Rain heads and hand showers mounted on the wall opposite the opening help.
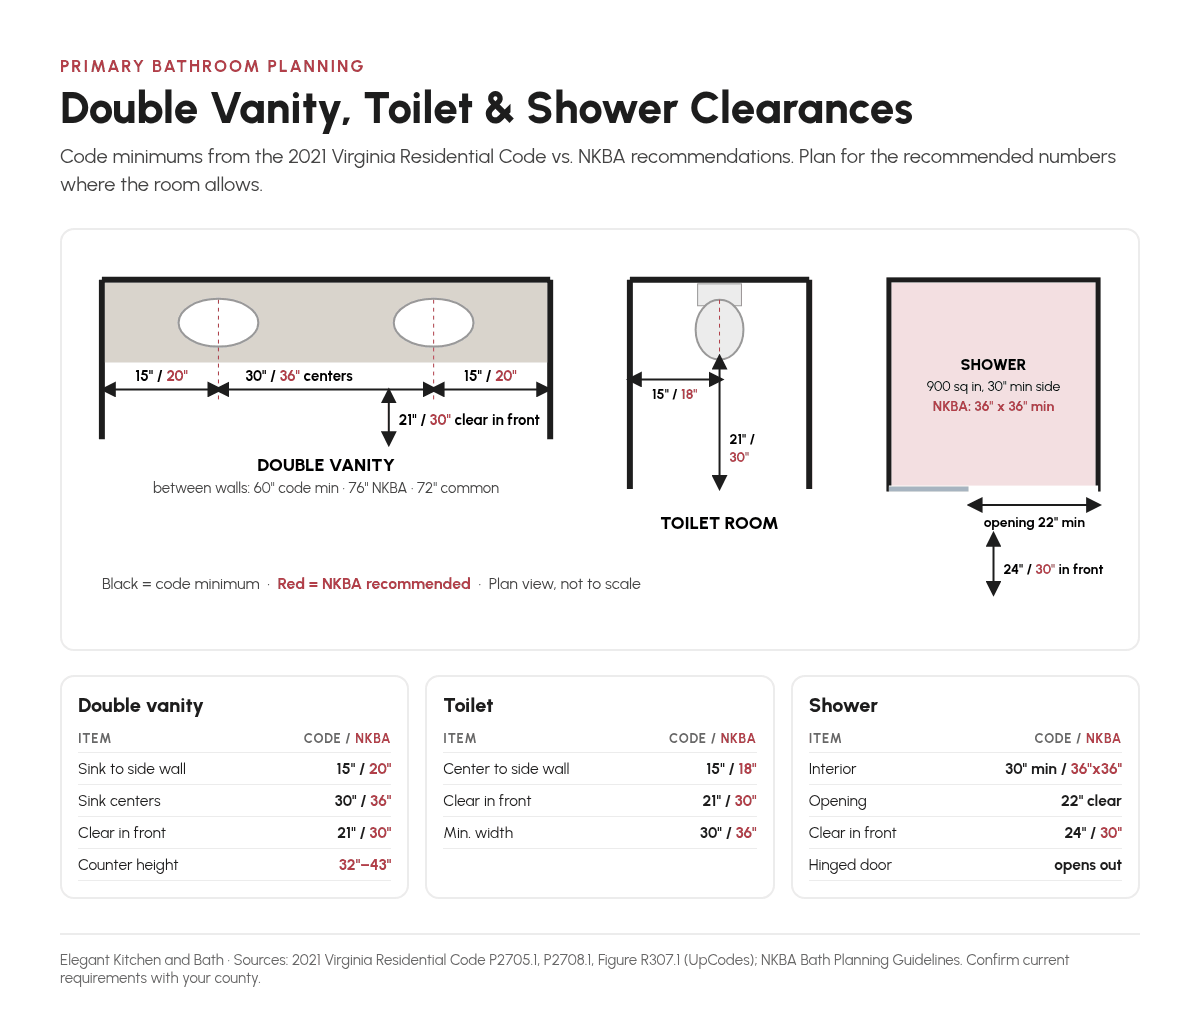
The code has three glass-related rules worth knowing. Hinged shower doors must open outward (section P2708.1). The access opening must have a clear width of at least 22 inches (P2708.1.1). And glass in shower walls and enclosures is a hazardous location that requires safety glazing when it is within 60 inches horizontally of the water’s edge and its bottom edge is less than 60 inches above the floor (R308.4.5). In practice, that means tempered glass for virtually all shower glass.
Size and comfort
The code minimum for a shower is 900 square inches of interior area with no dimension under 30 inches (P2708.1). That is a small shower. NKBA recommends at least 36 by 36 inches. For a primary bath with a curbless or doorless entry, think larger: about 60 inches wide is a common target, and the NKBA access standard describes a 60-inch-deep shower with a 32-inch entry or a 42-inch-deep shower with a 36-inch entry for roll-in use. Add a bench or a fold-down seat, a niche placed outside the direct spray, and a hand shower on a slide bar. The code allows fold-down seats if the 900-square-inch minimum is kept with the seat folded up.
Test before tile
A flood test is the only practical proof that the waterproofing works before it is buried. Schluter strongly recommends a water test before setting tile, waiting at least 24 hours after the membrane is installed, and for curbless showers it calls for a temporary dam at the threshold during the test. Ask any contractor whether a flood test is part of the schedule and who signs off on it.
Is my bathroom a good candidate for a curbless shower?
- Usually straightforward: a wood-framed floor with accessible joists below, joists running in a direction that lets the shower area be recessed, and no ductwork or drain lines crowding the joist bay under the shower.
- Possible with more work: a slab floor that must be cut, a finished ceiling below that must be opened, or a shower location that needs a new drain route.
- Needs engineering review first: shallow or long-spanning joists, engineered I-joists or trusses, or any plan that would cut or notch structural members.
Curbless entries are also a natural fit for wet rooms, where the shower and tub share one waterproofed zone behind glass. If that idea appeals, our guide to wet room bathroom remodels in Northern Virginia covers it in detail.
| Factor | Curbed walk-in shower | Curbless (zero-entry) shower | Tub-shower combination |
|---|---|---|---|
| Entry | Step over a curb, often a few inches high | Level with the bathroom floor | Step over the tub wall |
| How water is held in | Curb, at least 2 in. above the drain top (P2709.1) | Floor slope, drain placement and glass | Tub walls and a curtain or door |
| Floor structure | Usually no change | Usually recessed subfloor, a cut slab or a raised room floor | No change |
| Waterproofing | Shower pan and walls | Shower plus an extended wet zone, often much of the room | Walls above the tub |
| Best drain | Center or linear | Linear drain often preferred | Tub drain |
| Accessibility | Good for most users | Best; works with a walker or wheelchair | Hardest to step into |
| Relative cost | Moderate | Higher; Angi cites $500 to $700 or more over curbed, before any subfloor recess | Lowest |
| Best for | Most primary baths | Primary baths where you plan to stay, modern designs, aging in place | Homes that need one tub for bathing children |
Freestanding Tub vs. Garden Tub vs. No Tub
The tub decision shapes the rest of the layout, so it is worth settling early. There are three realistic options in a NoVA primary bath.
Keep a built-in garden or drop-in tub
The original garden tub is usually a large drop-in tub set into a tiled or cultured-marble deck, often under a window and sometimes with jets. Keeping it is cheaper than removing it, and some households do use it. The drawbacks are that it takes a large share of the floor, the deck is hard to clean, and stepping over a deck into a deep tub is awkward. If you keep it, a new deck surface, new faucet and better lighting can update it without moving plumbing.
Switch to a freestanding tub
A freestanding tub sits on the floor with no deck, often in the space the old garden tub or old shower used. Freestanding flat-bottom tubs were the most popular tub style in the Houzz 2025 study, chosen by 45% of homeowners who upgraded or added a tub, followed by alcove tubs at 40%. A freestanding tub needs clearance on all sides for cleaning and getting in and out, and floor-mounted fillers need the supply lines brought up through the floor, which affects the joists or the slab. It is also heavy when full, so the floor framing should be checked.
Remove the tub completely
In many primary baths the best use of the tub space is a larger shower. Of the Houzz respondents who removed a tub, 82% used the space to enlarge the shower. This works well when another bathroom in the house still has a tub for bathing children or for the occasional soak.
What about resale?
There is no reliable local study that puts a dollar figure on a primary bath tub in Northern Virginia, so be wary of anyone who quotes one. A sensible rule of thumb is to make sure the house keeps at least one bathtub somewhere, often in a hall bath, so families with young children are not ruled out. Beyond that, a well-built large shower is unlikely to be a weakness. Resale data for bathroom projects in general is covered in the budget section below. For high-end options such as soaking tubs, steam showers and custom stone, see our guide to luxury bathroom upgrades in McLean.
Double Vanities, Storage and Water Closet Planning
Double vanities are the most requested feature in primary bathrooms, and most of the planning comes down to inches. The building code sets the minimums, and the NKBA Bath Planning Guidelines recommend more comfortable spacing. Both are worth knowing before you choose a vanity size.
60-inch vs. 72-inch double vanity
The Virginia Residential Code (section P2705.1) says a lavatory, water closet or bidet cannot be set closer than 15 inches from its center to a side wall, partition or vanity, or closer than 30 inches center to center between adjacent fixtures. NKBA recommends 20 inches from a sink centerline to a side wall and 36 inches between two sink centerlines. Do the math for a vanity that sits between two walls:
- Code minimum: 15 + 30 + 15 = 60 inches. A 60-inch double vanity between walls is at the code minimum, with little elbow room between users.
- NKBA recommendation: 20 + 36 + 20 = 76 inches. A 72-inch vanity can reach the 36-inch sink spacing, with 18 inches from each sink center to the ends, which is more than the code minimum but slightly less than NKBA’s 20 inches if both ends are walls.
If the room cannot fit 72 inches or more, consider one long counter with a single sink, or two separate vanities on different walls. Two vanities across the room from each other are a popular primary bath layout because each person gets a mirror, a sink and storage, and nobody shares an elbow.
Height and storage
The older NKBA guidelines recommend a vanity height between 32 and 43 inches, depending on the user, so a vanity does not have to be the height of the one it replaces. Two heights are possible in a double vanity if two users differ a lot in height. For storage, drawers usually beat doors: a drawer bank on each side, a shallow top drawer for daily items, and a plumbing-friendly U-shaped drawer under each sink use the space better than open cabinets. A tall linen tower on the counter or beside the vanity takes the place of a separate linen closet. Medicine cabinets can be recessed into the wall where the framing allows, and outlets inside a drawer or medicine cabinet keep hair tools off the counter. For sink and vanity styles, see our guide to vanity and sink ideas for every bathroom type.
Plan the outlets with the vanity. The code requires at least one receptacle within 36 inches of the outside edge of each sink basin (section E3901.6), and bathroom receptacles must have GFCI protection (E3902.1).
Water closet (toilet room) planning
A separate toilet room is one of the most appreciated changes in a shared bathroom. The code minimums are 15 inches from the toilet’s centerline to any side wall or obstacle (so a 30-inch-wide space) and 21 inches of clear space in front of the toilet. NKBA recommends 18 inches from the centerline to any obstacle and 30 inches of clear space in front. A compartment that only meets the code minimum feels cramped, so plan for more where you can. Give the room its own exhaust fan or make sure the main fan pulls air from it, plan a light that is on a switch at the door, and consider a pocket door or an outward-swinging door so the door does not eat the clear space. If you are moving the toilet, remember that it must connect to the drain and vent system, which limits how far it can travel from the stack.
| Item | Code minimum (2021 Virginia Residential Code) | NKBA recommendation | Notes and source |
|---|---|---|---|
| Double vanity width (between walls) | 60 in. (15 + 30 + 15) | 76 in. (20 + 36 + 20) | A 72 in. vanity allows 36 in. sink spacing. P2705.1; NKBA Bath Planning Guidelines. |
| Sink spacing (centerline to centerline) | 30 in. | 36 in. | P2705.1; NKBA. |
| Sink centerline to side wall | 15 in. | 20 in. | P2705.1; NKBA. |
| Clear space in front of sink | 21 in. | 30 in. | P2705.1 and Figure R307.1; NKBA. |
| Toilet centerline to side wall or obstacle | 15 in. | 18 in. | A 30 in. wide toilet space is the code minimum. P2705.1; NKBA. |
| Clear space in front of toilet | 21 in. | 30 in. | P2705.1; NKBA. |
| Shower interior size | 900 sq. in., no side under 30 in. | 36 x 36 in. minimum | Larger is common in primary baths. P2708.1; NKBA. |
| Shower opening and door | 22 in. clear opening; hinged doors open outward | Wider for walk-in and curbless | P2708.1 and P2708.1.1. Safety glazing per R308.4.5. |
| Clear space in front of shower entry | 24 in. | 30 in. | Figure R307.1; NKBA. |
| Vanity counter height | Not set by code | 32 to 43 in., depending on user | NKBA guidelines (pre-2023 edition). |
| Receptacle near sink | Within 36 in. of each basin, GFCI protected | Outlets planned for each user | E3901.6 and E3902.1. |
Tile, Countertops and Flooring, Including Heated Floors
Finish selections are where a primary bath gets its character, but the best choices also fit how the room is used and how it is built.
Tile
Porcelain is the workhorse of modern bathrooms because it is dense, durable and available in nearly any look, from marble patterns to wood-look planks. In the Houzz 2025 study, porcelain (39%) and ceramic (26%) were the leading flooring materials outside the shower. Large-format tiles reduce grout lines on walls and on the main floor. On a shower floor, the slope matters: a linear drain lets large tiles run through the shower on one plane, while a center drain usually calls for smaller tiles or a cut pattern that follows the slopes. Smaller tiles also add grout lines, which can help with traction on a wet floor. Natural stone such as marble is beautiful but softer and more porous, so it needs sealing and gentler cleaners. Ask for tile rated for wet floors wherever you will stand in water.
Countertops
Quartz is the most common vanity top choice because it resists stains from cosmetics and hair products and needs no sealing. Natural stone such as marble or quartzite gives a one-of-a-kind look but needs more care. Solid surface and integrated sink tops are practical and seamless. For a double vanity, decide early whether you want undermount sinks, vessel sinks or an integrated top, because the faucet type and the vanity height depend on it.
Flooring and heated floors
Electric radiant floor heating is one of the most popular primary bath upgrades once the floor is open anyway. In the Houzz 2025 study, 20% of homeowners who upgraded a bathroom chose heated flooring outside the shower. HomeGuide lists electric radiant floor heat at $8 to $15 per square foot installed, before new flooring, and puts a primary bathroom of 60 to 160 square feet at about $500 to $2,400 for the heating system alone or about $700 to $8,800 with new flooring. A thermostat ($140 to $350) and sometimes a dedicated circuit ($250 to $900) can be extra. These are national typical ranges, not quotes. A heated floor is usually controlled by a programmable thermostat so it warms the floor before you get up and switches off when the room is empty. Some heating mats are rated for use inside the shower, which is useful in a curbless design where one tile floor runs through the room. Tile and stone work best over heat. For a deeper comparison of LVP, tile, hardwood and radiant options, see our guide to the best flooring for kitchen and bathroom remodels.
Lighting, Ventilation and Smart Fixtures
Layered lighting
Primary baths need three kinds of light. Task lighting at the mirror should come from the sides or from directly in front of the face, such as vertical sconces or a lit mirror, rather than a single fixture overhead that casts shadows. Ambient lighting, usually recessed fixtures rated for damp or wet locations, lights the room and the shower. Accent and night lighting, such as toe-kick strips under the vanity or a low light in the toilet room, lets you move around at night without turning on everything. Put each layer on its own switch or dimmer. Warmer color temperatures feel more relaxing, while a high color rendering index helps with makeup and grooming.
Ventilation: what the code requires
Moisture is the enemy of every bathroom, and a primary bath with a large shower produces a lot of it. Section R303.3 of the Virginia Residential Code requires bathrooms to have at least 3 square feet of window, half of it openable, unless artificial light and a local exhaust system are provided. Table M1505.4.4 sets the minimum exhaust capacity for bathrooms and toilet rooms at 50 cfm for an intermittent fan or 20 cfm for a continuously running fan. Section M1505.2 requires bathroom exhaust to go directly to the outdoors, not into an attic or crawl space. Older homes sometimes have fans that dump air into the attic, and a remodel is the time to fix that.
The code numbers are minimums. A large primary bath with a big shower, a separate toilet room or a steam shower usually benefits from a higher-capacity fan, a fan placed near the shower, or a second fan in the toilet room. A humidity-sensing control or a timer switch keeps the fan running long enough after a shower to clear the room. Quiet fans get used more, so check the sone rating.
Shower valves and smart fixtures
Every shower valve must be a pressure-balancing, thermostatic or combination valve, and must be set to limit water temperature to 120°F (section P2708.4). Thermostatic valves let you set an exact temperature and often run several outlets, such as a rain head, a hand shower and body sprays. Digital shower controls go a step further with presets and app control. Smart toilets with heated seats and bidet functions need a GFCI-protected outlet behind the toilet, so plan the wiring before the walls are closed. Other useful upgrades include anti-fog mirrors, heated towel bars on a timer and motion-activated night lights. Keep each item tied to how you will use the room, because every powered feature adds wiring and, sometimes, a dedicated circuit.
Budget Tiers: Refresh, Reconfigure, Spa
Primary bath budgets depend on scope far more than finish level, which is why the scope tiers in Table 1 come first. We keep this section short, because our Northern Virginia bathroom remodeling cost guide covers line items in detail. Here is what national sources publish. All of these are typical ranges, not quotes, and they include different scopes, so use them only to set expectations.
- Full primary bath remodel: HomeGuide puts a standard master bathroom remodel, replacing fixtures and surfaces without layout or structural changes, at $150 to $300 per square foot, or $15,000 to $30,000 for a 100-square-foot primary bath, taking about two to four weeks.
- Spa-level or reconfiguration: HomeGuide lists premium remodels with layout, plumbing and electrical changes at $300 to $500 or more per square foot, or $30,000 to $50,000 for 100 square feet, taking about four to eight weeks or more. Its size table runs up to $97,500 for a 195-square-foot bath and $112,500 for 225 square feet.
- Refresh in place: Smaller scopes that keep the plumbing where it is usually fall toward the lower end of these ranges or below them. Our cost guide breaks down what moves the number.
National data gives a lower baseline. Houzz reports a national median of $25,000 for major remodels of bathrooms of 100 square feet or more in 2024, with the top 10% at $70,000 or more. Northern Virginia labor and permit costs push local projects above national medians.
Resale is part of the conversation but rarely the whole reason for a primary bath. In the 2025 Cost vs. Value report for the Washington, D.C. area, a midrange bath remodel had an average job cost of $25,936 and recouped 68% at resale, an upscale bath remodel cost $80,994 and recouped 40.1%, and a universal design bath remodel cost $41,832 and recouped 62.1%. Those projects are defined by the report and are not the same as a full primary suite, but they show that a bathroom is usually a quality-of-life investment first and a resale investment second.
The biggest budget swings in a primary bath are usually moving drains, a curbless shower with a recessed subfloor, custom glass, large-format or natural stone tile, and expansion into adjacent rooms. Build in a contingency for what you find behind the walls, especially in older homes.
Permits for a Primary Bathroom Remodel in Fairfax and Loudoun
Whether you need a permit depends on what the project touches. A primary bath remodel that moves plumbing, adds circuits or changes walls needs permits in both counties. The details below come from the county pages linked in each section. Towns and cities inside the counties can have their own rules, so confirm your jurisdiction before you apply.
Fairfax County
Fairfax County Land Development Services publishes a list titled Does My Project Require a Permit?. It lists interior alterations and renovations, including bathroom remodels, as work that requires a building permit. It also requires permits for new, repaired or relocated plumbing and gas fixtures, including water closets, for new or relocated electrical fixtures, and for mechanical work such as ductwork. The same page lists work that does not need a permit, including bathroom countertops and vanities, replacement of tiles, replacement of flooring material, painting, and the direct replacement of plumbing fixtures with no change in location and a like-for-like replacement.
- What that means in practice: A cosmetic refresh that swaps a vanity, tile and fixtures in the same places may not need a building permit. Moving the shower, toilet or vanity drain, adding circuits for heated floors or lighting, or rerouting the fan duct does.
- How to apply: Residential alterations are filed in the county’s PLUS system as an Addition/Alteration (Residential) record. Electrical, plumbing and mechanical work are separate trade permits linked to the building permit.
- Fees: The county’s Appendix Q fee schedule, effective July 1, 2026, lists residential repairs and alterations at 3.00% of the estimated construction cost, with a $141.75 base fee, plus listed surcharges. Trade permits have their own fees.
- Inspections: Inspections are scheduled in PLUS. Rough-in inspections happen before walls and floors are closed, and the final inspection closes the permit.
- Towns: Projects in the Town of Vienna or the Town of Clifton also need town approval.
Our article on how many permits a Fairfax County remodel needs explains how the building permit and trade permits fit together. The process is the same for a bathroom.
Loudoun County
Loudoun County’s Residential Additions and Alterations page requires a building permit for residential alterations. The application is signed by the property owner, and the plans must detail all structural elements. Trade permits for electrical, gas, mechanical and plumbing work are filed as separate records, as the county’s construction permits page explains. Alteration inspections include framing and final inspections, plus rough-in and final inspections for each trade, and the approved plans must be on site. The building permit fee for residential alterations is listed as 1% of construction cost plus a $130 plan review fee. The county’s Residential Permits Processing Dashboard lists up to 10 business days for intake on most residential permits, a 15-day building review timeline for alterations and 2 days for trade permits. Loudoun’s code exemptions for work such as replacing fixtures without changing piping are covered in our Loudoun County remodeling permits guide.
Who handles the permits
On a remodel of this size, the contractor normally prepares the drawings and handles permits and inspections, but you should know who holds each permit and who will be on site for each inspection. Ask for copies of the issued permits and the passed inspections for your records. They matter when you sell the house.
Timeline and Living Through the Remodel
Primary bath timelines have two parts: the time before construction and the time on site. HomeGuide’s national estimates put a standard master bath remodel at about two to four weeks and a premium remodel with layout changes at four to eight weeks or more, measured from demolition to completion. Moving walls, recessing a shower floor and waiting on inspections all push a project toward the longer end. Before that come design, selections and permits. Special-order items such as custom vanities, imported tile and some fixtures can take weeks to arrive, so order them before demolition starts.
Typical sequence
- Design and selections. Measure the room, settle the layout and choose fixtures, tile, vanity and lighting.
- Drawings and permits. Prepare drawings where required and file the building and trade permits.
- Protection and demolition. Protect floors and the path through the house, set up dust control, and remove the old finishes and fixtures.
- Framing and rough-ins. Make any framing changes, recess the subfloor for a curbless shower, run new drain, supply, electrical and duct lines, and pass rough-in inspections.
- Waterproofing and flood test. Install backer board and membranes, then flood test the shower before tile.
- Tile and heated floor. Install floor heating, then tile floors, shower and walls.
- Vanity, tops and fixtures. Set the vanity and tops, then install toilets, faucets and trim. Custom glass is usually measured after tile and installed near the end.
- Final inspection and punch list. Pass final inspections, finish paint and accessories, and walk through the room together.
Living with the work
Because the primary bath is attached to your bedroom, the project will be part of your daily life for several weeks. Plan to use another bathroom for the duration, and clear the bedroom closet and dressers near the work area. Expect noise during demolition, short water shut-offs when plumbing is connected, and dust despite barriers. Agree in advance on working hours, where the crew parks and enters, and where materials will be stored. A weekly check-in, in person or by message, keeps decisions moving. You can read how we structure those steps on our remodeling process page.
Designing for Today and Aging in Place Later
You do not need to build a medical-looking bathroom to make the room work later in life. Most aging-in-place features are invisible or simply good design: a curbless shower entry, a bench, a hand shower on a slide bar, lever handles, slip-resistant floor tile, good lighting and a comfort-height toilet. The single most valuable step costs little during construction: add solid blocking inside the walls around the toilet, the shower and the tub so grab bars can be added later without opening the walls.
NKBA’s access standard is a useful reference. It describes a 30-by-48-inch clear floor space at fixtures and a 60-inch turning circle for wheelchair users, along with roll-in shower entries of 32 inches for a 60-inch-deep shower or 36 inches for a 42-inch-deep shower. Not every primary bath can meet all of these, but planning toward them where the space allows keeps options open. The Cost vs. Value data above shows that universal design bath remodels recouped 62.1% in the Washington, D.C. area. For the full picture, read our guide to aging-in-place bathroom remodeling in Northern Virginia.
Frequently Asked Questions
How much does a primary bathroom remodel cost in Northern Virginia?
It depends mostly on scope. HomeGuide puts a standard master bath remodel without layout changes at $150 to $300 per square foot, or about $15,000 to $30,000 for 100 square feet, and premium remodels with layout, plumbing and electrical changes at $300 to $500 or more per square foot. Those are national figures, not quotes; local labor and permit costs can push Northern Virginia projects higher. Houzz reports a national median of $25,000 for major remodels of bathrooms of 100 square feet or more, with the top 10% at $70,000 or more. Moving drains, a curbless shower with a recessed subfloor, custom glass and expansion into adjacent rooms push costs up.
Do I need a permit for a primary bathroom remodel in Fairfax County?
Usually, yes. Fairfax County lists bathroom remodels, relocated plumbing fixtures including toilets, new or relocated electrical fixtures and ductwork as work that requires a permit. Replacing a vanity or countertop, replacing tile or flooring, painting and like-for-like fixture replacement in the same location do not. In Loudoun County, residential alterations need a building permit, with separate trade permits for electrical, plumbing, mechanical and gas work.
What is a curbless shower and how is it built?
A curbless, curb-free or zero-entry shower has no raised curb, so the bathroom floor runs into the shower at the same level. The shower floor slopes to the drain at 1/4 to 1/2 inch per foot under the Virginia Residential Code, often toward a linear drain. A bonded waterproof membrane covers the shower and usually extends into the bathroom floor, and the subfloor in the shower area is usually recessed so the floor can slope without a step.
Can every bathroom have a curbless shower?
Many can, but not all easily. Wood-framed floors with accessible joists are usually the most straightforward. Concrete slabs need to be cut, finished ceilings below need to be opened, and shallow joists, engineered I-joists or trusses need review by a design professional before anything is cut. In some homes the alternative is to raise the rest of the bathroom floor slightly instead of lowering the shower.
Should I remove the tub in my primary bathroom?
If the tub is rarely used and the shower is small, removing it is often the best use of space. In the Houzz 2025 study, 26% of renovating homeowners removed the tub and most of them used the space to enlarge the shower. Many homeowners make sure at least one other bathroom in the house keeps a tub, which helps households with young children.
How wide should a double vanity be?
Between two walls, the code minimum for two sinks works out to 60 inches: 15 inches from each sink center to the wall and 30 inches between centers. NKBA recommends 20 inches to the wall and 36 inches between centers, which works out to 76 inches. A 72-inch vanity is a common compromise that allows 36-inch sink spacing.
Are heated bathroom floors worth it?
Many homeowners think so, especially with tile floors in winter. HomeGuide lists electric radiant floor heating at $8 to $15 per square foot installed before new flooring, or about $500 to $2,400 for the heating system alone in a primary bathroom of 60 to 160 square feet. It is easiest and least expensive to add when the floor is already being replaced.
How long does a primary bathroom remodel take?
HomeGuide’s national estimates run from about two to four weeks on site for a standard master bath remodel to four to eight weeks or more for a premium remodel with layout changes; moving walls, recessing a shower floor and inspections push toward the longer end. Design, selections, drawings and permits come before that. In Loudoun County, the county lists up to 10 business days for intake and a 15-day building review timeline for alterations.
Planning Your Primary Bathroom Remodel
A good primary bathroom starts with a clear list of what does not work today and a decision about how much of the room will move. From there, the shower, the vanity, the toilet room and the finishes fall into place, and the budget follows the scope. If a curbless shower is on your list, have the floor framing checked early, because it decides how the shower is built. For a wider look at bathroom projects across the region, see our Northern Virginia bathroom remodeling playbook. You can also see our local pages for bathroom remodeling in Fairfax, VA, bathroom remodeling in Reston, VA and bathroom remodeling in Ashburn, VA.
When you are ready to talk through your own room, book a design consultation with Elegant Kitchen and Bath. We will look at the layout, the framing and the plumbing, talk through the options, and lay out a permitted plan for your new primary bathroom. You are also welcome to visit our Herndon showroom to see tile, vanities and fixtures in person.